Ever heard the saying “less is more?”
Simple things often make the most difference. Such as with doing a popcorn ceiling removal in your home. If you’re already familiar with what I’m talking about then you’re probably saying to yourself, “Eh, yeah right.” And, “What’s simple about that?”
Stay with me here.
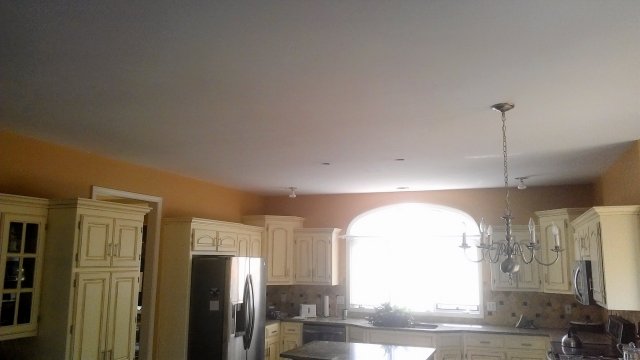
While I agree it’s a messy project, you have to admit that removing your old popcorn ceiling texture and replacing it with either a knockdown style or leaving your ceilings smooth does make a huge difference in the appearance of your home. And the best part of it is, it’s a relatively inexpensive process to do.
Sounding better?
I get hired to do a lot of these throughout the year for people whether they occupy the home or want the work done before moving into a newly purchased home. It’s easier with the latter, but very doable regardless.
I’m writing this to help the avid DIY’er that wants to undertake their own popcorn ceiling removal project and achieve the best results. You’ll get a step by step process on what to do to make your project shine. Let’s dig in!
What you’ll need to complete your project: (All of which you can find at your local Home Depot)
1) A roll of 9′ x 400′ Painter’s Plastic (or 12′ x 400′ if you have higher walls)
2) A roll of 1 1/4″ Blue Painter’s Tape (Make sure you DON’T get the delicate surface stuff) I’ll explain why later.
3) A bag of USG Unaggregated Ceiling Texture *Assuming you want a knockdown style texture (your project may require more) For a 10′ x 10′ room one bag will be plenty.
4) A 5 gallon bucket
5) A drill and spinner paddle for mixing your mud
6) A garden sprayer
7) A texture sprayer (Which can be rented by the hour or day from HD)
8) A ladder
9) A drywall putty knife (6″ or 10″ whatever is more comfortable for you)
10) Patience
Your set! So let’s go…
Firstly, we need to get that ugly popcorn texture down. Yes, you can do this!
What I like to do before putting up plastic or tarping the floors is to take a damp rag and wipe down the entire perimeter of the room (on the wall side) where the top of the wall corner meets the ceiling. I do this so that if there’s dust (which there probably is) it won’t keep the painter’s tape from sticking well. You want that. Because when you go to spraying the new texture on your ceilings, the weight of the oversprayed mud will drop that plastic in a heartbeat. Trust me!
It’s cool (and funny for a minute) to watch the plastic literally drop like dominoes around the room I won’t lie, but it’s so deflating when you have to backtrack and rehang it all to complete the job. So take a little time to clean the area first so that doesn’t happen. Unless you just want to see it for yourself. 😉
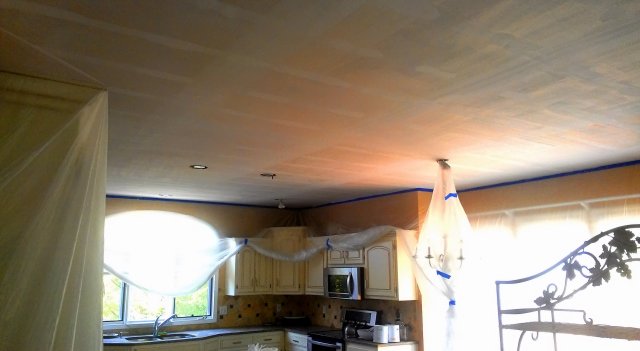
So once we have that done you’ll want to hang the plastic. I like to keep one continuous piece all the way around the room. (That eliminates any chance of me getting overspray everywhere) What I do is take my roll of plastic starting at a doorway, and roll it out on the floor the length of the wall. Then at the corner roll it the length of that wall and so on until I get back to where I started. Then cut your plastic with a utility knife and unfold it.
Once that’s done you’ll grab your blue painter’s tape and start by ripping a small 2″ to 3″ piece. Find one end of your plastic and attach the tape horizontally to the plastic so that half of the tape is exposed and half is stuck to the plastic. Then (while standing on a bucket or ladder) attach the exposed part of your tape just below the ceiling on the wall side. Then I rip off another small piece of tape and attach it to the plastic about two feet further down the wall to hold it up for me so I can pull a long rip and attach the tape that goes between the two small pieces.
I usually start my plastic in the middle of a doorway and as I go around the room taping up the plastic I will finish up by overlapping where I started about a foot or two. If you’re confused see the pic above of how it should look. (I do that btw to make a “doorway” with the plastic for easy entrance to the room.)
Done with that yet? Let’s move on, we’re burning daylight. 🙂
So we got all the plastic up now we need to cover the floors. You can roll out plastic the length of the floor, cut it, and unfold it OR you can use painter’s tarps or old sheets. Personally I don’t like covering the floors with plastic because once you start spraying the texture the mist from spraying has a tendency to make the plastic tacky and stick to your shoes. It’s irritating trying to move around all the while concentrating on making your spray pattern look good. You’ll feel like a cat with tape on it’s feet.
Now that the prep is done we’re ready to start seeing some big changes happen!
Fill your garden sprayer with regular tap water. Warm or hot makes no difference and pump up your sprayer. Once it gets too hard to pump you’re ready to go. Pick a corner of the room. Any corner, and begin wetting the ceiling down. I suggest working half the room at a time. That way you’re not overwhelmed and the ceiling stays damp enough to work easily. Go ahead and saturate it pretty good. You’ll see the whiteness of the ceiling color turn a darker color.
Let the water soak in for about 5-7 minutes and then begin scraping off the popcorn texture with you drywall knife. Some people prefer a 6″ but I like using a 10″. It’s faster that way. Just be careful when scraping not to apply too much pressure otherwise you risk gouging the drywall, meaning you’ll need to make repairs before spraying on the new texture. *Here’s a tip for scraping: Hold your knife so that it’s almost parallel to the ceiling surface as you scrape. Doing so will reduce the risk of damage to your drywall. And remember, the stuff will come off pretty easy since it’s just wet mud with styrofoam pellets in it, so there’s no need to dig at it.
Things are beginning to look much different now huh?
Guess what time it is now? Spray time! Yeah!! If you’re a man, you will more than likely enjoy this part the most. It will instantly take you back to your childhood and remind you of how much fun it was to make a mess and get dirty, good times!
*For everything you need to know about spraying technique and mixing your mud you’ll have to see my other post that I explain in detail how to do below. I didn’t realize it was so late and I have church in the a.m.
Please let me know if you found this helpful. Thanks in advance.


One thought on “How To Achieve Results That Will Dramatically Improve Your Home’s Beauty. Fast!”